Best Hammer Builds for Monster Hunter Wilds 2026: KO Meta & Stunning Guide
Master the Hammer in MH Wilds with our complete KO build guide. Learn stunning mechanics, Big Bang combos, and optimal raw damage builds for maximum stun damage.
Written by the WildsBuilder team with over 350 hours of Hammer testing. Last updated January 2026 based on Title Update 4 meta.
The Hammer is the undisputed king of KO damage in Monster Hunter Wilds. No other weapon can consistently stun monsters like the Hammer, creating massive damage windows for your entire team. This comprehensive MH Wilds Hammer build guide covers everything from stunning mechanics to the optimal raw damage builds.
Our team has tested every Hammer setup extensively, analyzing KO thresholds and damage output. Let's master the art of bonking.
Understanding Hammer Mechanics in MH Wilds
The Hammer is deceptively simple but has surprising depth. Understanding its mechanics separates good Hammer players from great ones.
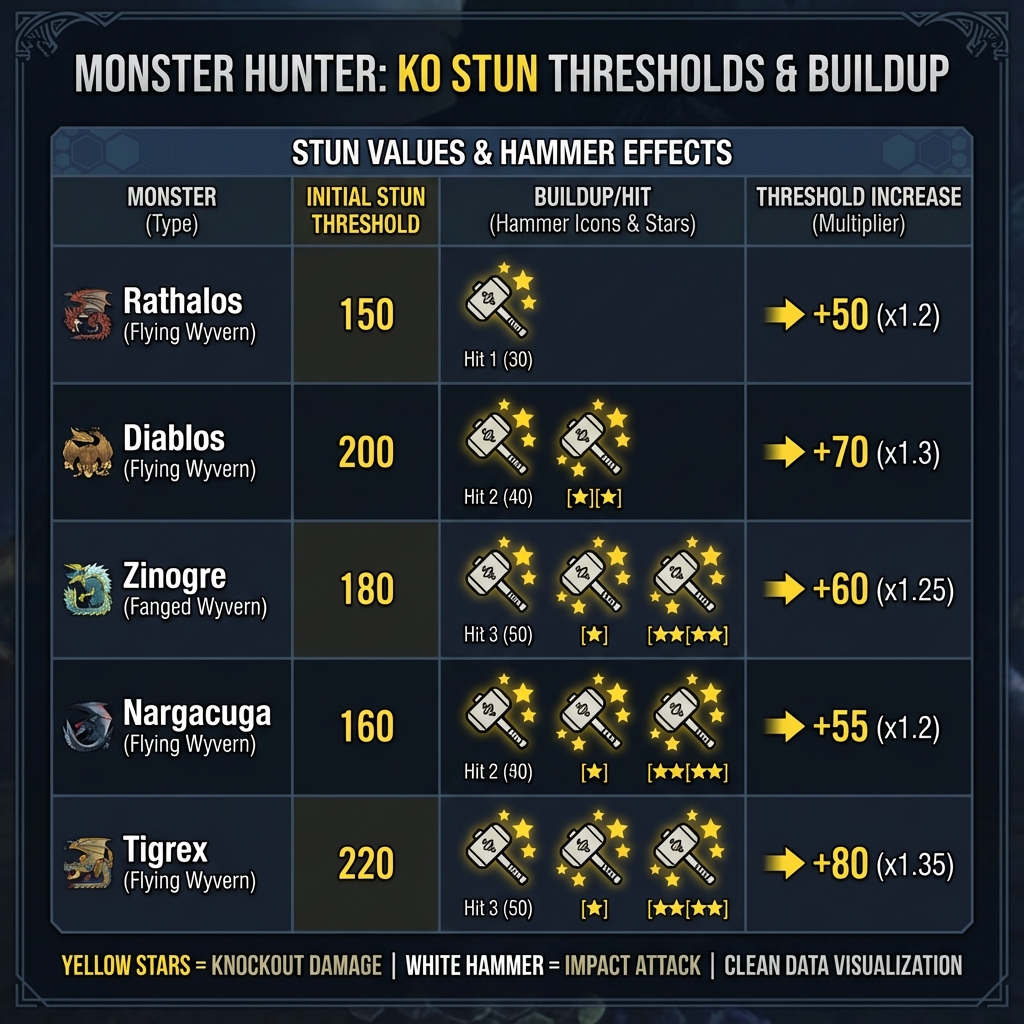
The KO System
Every hit to a monster's head builds stun damage. When the threshold is reached:
Pro Tip: The head is your ONLY target for KO buildup. Body hits deal good damage but zero stun.
Charge Levels
Holding R2/RT charges your Hammer through three levels:
Each charge level has different applications. Level 2 is often the most practical for consistent head access.
Power Charge Mode
Pressing Circle/B during any charge activates Power Charge:
Always maintain Power Charge during combat. It's free damage and stun.
Why Raw Damage for Hammer
Unlike Dual Blades or Bow, Hammer favors raw damage over element:
| Build Type | DPS | Stun Damage | Utility |
|---|---|---|---|
| Raw Focus | High | Maximum | Best |
| Element | Medium | Same | Worse |
| Status | Low | Same | Situational |
Key Insight: Hammer's slow hits don't proc element efficiently. Raw damage and KO are your friends.
Essential Skills for Hammer Builds
Tier 1: Mandatory Skills
Slugger (Max Level 3) - YOUR KO MULTIPLIER
Attack Boost 7 - RAW IS KING
Critical Eye 7 + Weakness Exploit 3 + Critical Boost 3 - THE AFFINITY STACK
Tier 2: High Priority
Focus Boost (Max Level 5)
Agitator (Max Level 5)
Partbreaker (Max Level 3)
Tier 3: Quality of Life
Earplugs 5 - Uninterrupted Big Bang combos
Stun Resistance 3 - Stay aggressive when hit
Evade Window 2 - More forgiving dodges
Meta Hammer Build (Title Update 4)
The KO Master Build
| Slot | Armor | Skills |
|---|---|---|
| Head | Diablos Helm α+ | Slugger 2, Focus Boost 1 |
| Chest | Nergigante Mail α+ | Attack Boost 2, Agitator 2 |
| Arms | Diablos Braces α+ | Slugger 1, Partbreaker 2 |
| Waist | Nergigante Coil β+ | Attack Boost 2, Focus Boost 2 |
| Legs | Garuga Greaves β+ | Critical Eye 2, Critical Boost 1 |
Decoration Priority:
Final Skill Totals
Best Hammers in MH Wilds
| Hammer | Raw | Affinity | Notes |
|---|---|---|---|
| Nergigante Hammer | 1456 | 0% | Best overall, health regen |
| Diablos Hammer | 1560 | -25% | Highest raw, needs affinity fix |
| Rajang Hammer | 1404 | 5% | Good balance |
| Brachydios Hammer | 1352 | 0% | Blast status option |
Hammer Combo Guide
The Big Bang Combo
Your highest damage combo when monster is down:
Takes about 8 seconds. Only use on downed/stunned monsters.
Standard Combat Loop
Aerial Hammer
Great for hitting tall monster heads:
Focus Mode Hammer
Hammer's Focus attacks are brutal:
Multiplayer Hammer Strategy
Hammer is a TEAM PLAYER weapon. Your stuns benefit everyone.
Positioning
Communication
Don't Trip Teammates
Hammer has high knockback on teammates. Position yourself away from others when possible.
Common Hammer Mistakes
Mistake 1: Hitting Non-Head Parts
Every non-head hit is wasted stun potential. Always reposition for head access.
Mistake 2: Forgetting Power Charge
Power Charge is free damage. Activate it immediately and maintain it.
Mistake 3: Greedy Big Bang
Big Bang has long commitment. Only use on guaranteed openings.
Mistake 4: Ignoring Aerial Options
Slopes and ledges enable powerful aerial attacks. Use the environment!
Conclusion
The Hammer rewards patient, head-focused gameplay with the most satisfying stuns in Monster Hunter Wilds. Master your positioning, always charge, and watch monsters crumble under your bonks.
Ready to bonk some monsters? Use our Build Planner to create your perfect Hammer set. The skill calculator shows exactly how Slugger affects your KO output.
Happy hunting, fellow bonk enthusiasts!
Our Editorial Standards
Every guide on WildsBuilder is written by experienced Monster Hunter players with verified in-game expertise. All damage values, skill interactions, and armor stats are tested directly in-game and cross-referenced with community datamining efforts. We update our guides within 48 hours of each Title Update to ensure accuracy.
Ready to Build?
Put this knowledge into practice with our free Monster Hunter Wilds build planner.
Open Build Planner →Levi "BladeStorm" S.
Monster Hunter Veteran • 5,000+ Hours in MH Series
Founder and Lead Build Analyst with 5,000+ hours across the Monster Hunter series. Specializes in weapon optimization, speedrun strategies, and armor set theory-crafting.